Tuesday, May 31, 2011

Rhubarb Season

There are many things I love about spring: sunshine, blossoms, sunshine, flowers, sunshine, asparagus, sunshine, longer days (aka sunshine)... but one of my favorites for as long as I can remember, has always been rhubarb.
(Asparagus is a close second, mind you, but to be honest, I really didn't start liking it until I was well out of "childhood", so it doesn't win the all-time favorite award!)

Our rhubarb patch - to the left the two big plants are ones I
bought as starts at the Farmer's Market two years ago.
They're doing well size-wise, but their taste is not good -
dry, stringy and mostly green in color. The other six plants
were transplanted from my Aunt's gorgeous Rhubarb plot up
in Auburn - we hope to be harvesting from them next year!

Rhubarb pies, rhubarb sauce, rhubarb crumbles, rhubarb cake, you name it, I love the chewey, sour brightly colored stalk. I'm lucky enough to have a nearly endless (and at no cost!) supply from my father's garden so I am free for these few months a year to fully indulge my rhubarb fancy.

Now also here in this house, we seem to go through jam/jelly like it's going out of style. I'm talking about a half-pint a week, sometimes more. I thought our freezer had at least two year's worth by the end of last summer with something like 16 jars of strawberry and 23 jars of raspberry, but here we are, the end of May (ie. still weeks away from jelly-making fruit, if it even comes on this year with all this rain we've been getting!), and we have only five left total down in the freezer.

So this year decided to branch out in my modes of rhubarb consumption, and try making rhubarb jam. How could it not be yummy, after all - rhubarb plus sugar? Hard to go wrong, I say!

Turns out my hunches were right on this one, and it is indeed quite delightful. I searched for some time for recipes, and found many (both online and in my mother's voluminous recipe boxes) that actually used a box of red (yes, red, not cherry, not strawberry, but "red") jello. Somehow that just didn't seem right. I ended up going with the recipe from the Ball Blue Book of Canning, which was a Rhubarb-Orange jelly. It has a great rhubarb flavor upfront, but finishes with a hint of orange. I like it!

I adjusted it only slightly - and here's how I did it:

   1.   Washed, trimmed and diced 2 1/2 pounds of fresh rhubarb.

   2.   Juiced enough oranges (in my case 3) to get one cup of fresh OJ.

   3.   Scraped the white pith off about 1/3 of one orange peel, and then cut that into slivers.
The recipe said to slice off all the white - I likened this to
"reverse zesting"!
These are my slivers. I actually went on and
cut these two more times so I'd not end up
with long pieces of zest in the jam.

   4.   Cooked the rhubarb, the OJ, and the zest, covered for about five minutes - until tender and juicy. 
   5.   Added one container of pectin.
   6.   Brought that to a boil
   7.   Added 6c (yes, that's "six") of sugar*

   8.   Stirred it in an brought it to a boil again. Once it was really rolling, I timed it for one full minute.
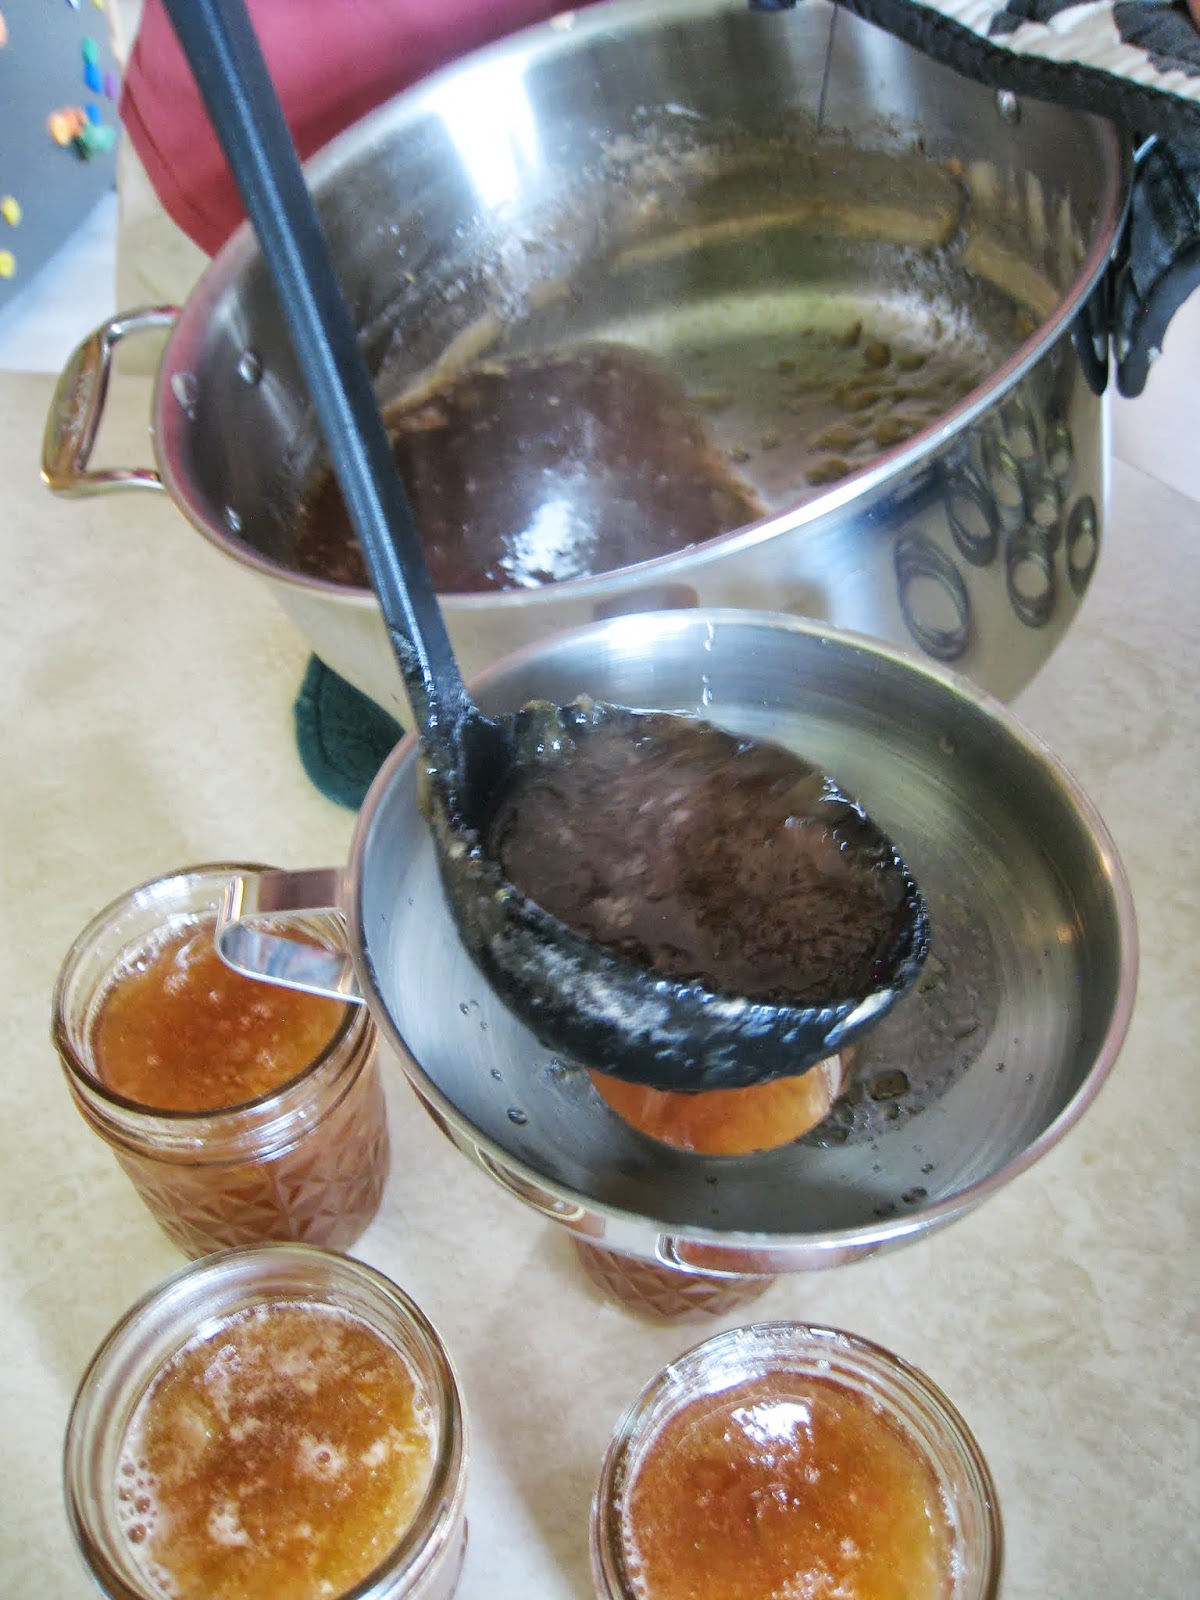
   9.   Ladelled the jam into clean, hot jars, wiped the lips and sealed them.

   10. The original recipe calls for processing in a water bath at this point for 10 minutes - my plan is to (after 24 hours) move them to the freezer.**

* I wish there was a way to make jam work with less sugar. I make sugar-free varieties of some fruits, using grape or cranberry juice as a sweetener, but I couldn't see how to make that work with this recipe. I don't want to use things like Nutra-sweet or Splend (yucch), but I'd sure love to be able to make my jams set with at least a little less sugar! Anyone out there have any suggestions?
** I find I prefer the fresher taste of freezer jam, though I'm sure it would be fine as canned jam too.

Happy Rhubarb Season to all of you!
_________________________________________________________________________________

In other local news, we had our first picnic of the year down at Meyer's park at the lake. This year we're keeping our canoe right in the storage area by the water, so getting out for a paddle will be easier than ever. The little Bug wouldn't go in the boat on the water, but he did finally get in the canoe while it was laying on the grass and  played around some - hopefully next time we'll get him out for a ride!  


Sunday, May 22, 2011

Kombucha

Jars of freshly bottled Kombucha!
Several years ago, in what sometimes feels like my "other life" in southern California, I was introduced to a drink called Kombucha. I'd never hear of it until my good friend PD brought a couple bottles to the office for us to drink after our noon-time run on the beach (see previous comment on "other life"). She said to me "you'll either love it or hate it, but I have a feeling you'll be a lover".  She was right, and I was hooked.

Outside of the great flavor and the fact that it was supposed to be one of those "magic elixir" cure-all drinks, I loved that I could drink half a bottle, cap it, throw it back in the fridge and when I wanted to finish it the next day, it hadn't gone flat! Turns out, that's because even after bottling, the fermentation process continues. The main "mat" of culture is not in the bottles, but there's still enough in the drink to keep producing just a little gas, so  unlike soda, it never really gets old and unpleasant to drink.

The brand that got me hooked was GT's; it's still commercially available, though I think they've gone through some labeling/marketing changes of late. They come in many flavors and my favorites were cranberry and raspberry - the more sour the better! It's not cheap though so despite my love of the drink, I kept it as a special treat. I'd heard from friends that you can brew it yourself (it's a tea of sorts, fermented with kombucha cultures that you can use over and over again, kind of like making yogurt or sourdough), but I'd not heard where you can get the culture (often called a SCOBY, the acronym for Symbiotic Colony of Bacteria and Yeast, a mushroom, or a kombucha mother), so never tried it.

Close up of the starter culture / SCOBY, now several
generations old. You can see the multiple layers to it, with
the new "daughter" culture growing beneath the "mother"
with each batch that is brewed..

Fast forward to our "new life" in New York. We now live just outside the town of Ithaca, and I'd not had a kombucha drink in months (years maybe?!). In looking through the free section of Craig's list, I found an advertisement for kombucha starters, ready to go, just come and get them. Leave it to lovely, hippie Ithaca to have such a thing posted on Craig's list! I kept the phone number in my wallet for weeks and finally late last fall managed to meet up with the guy giving away the cultures; I had my ziplock baggie with the wispy looking "daughter" and some vague directions and was on my way.

Several generations later, I'm now pretty comfortable with the whole process and love that I can have as much as I want, whenever I want! I've even gotten my father hooked on the stuff, and gave him a "daughter" SCOBY so he too can make his own! My friend PD was right though - people either love it or hate it. My mom and Doug can't stand the stuff, though both tolerate the brewing jugs on their kitchen counters since they know it keeps their respective partners so happy!

From what I can tell, it's of Russian (or maybe Chinese?) origin, but versions of it are found in other cultures too, including Japan and Korea. You start with a sweetened tea (black or green), add the kombucha culture and allow it to work for several weeks at room temperature. It can then be bottled and again left at room temperature to allow the carbonation to build up. When it's how you like it, just refrigerate to store and enjoy (filtered, or not!). You can add flavoring (I tried cranberry and raspberry), but I found that one of the best parts about the home-made kombucha is that the flavor of the pure tea is so good on its own, that the added flavors are totally unnecessary. It's tart (some would say vinegar-ey) and light and refreshing, and now for me, an affordable pleasure!

How I make my kombucha batches:

     1.  Pull mother culture / SCOBY out of my currently batch of kombucha (nope, there's no picture of this - I forgot to take it!) and set it aside. Also measure out and set aside about 2 cups of the running batch.
Main culture (SCOBY) and an aliquot of the
old batch set aside to use in the new batch
     2.  Bottle the rest of my batch, and wash out the container. Set it aside to use again.
     3.  Brew some strong tea, using filtered (I use a Brita) water. I use black tea. Supposedly green is also OK but will require more sugar, and I've read to avoid herbals. Right now, I'm just keeping it simple with Salada. I brew it strong - five bags in about four to six cups of water, steeped for ten to fifteen minutes.
     4.  While the tea is still hot, mix in 1 1/2 to 2 cups of sugar. Pour this hot tea into my now empty, clean brewing container.
     5.  Dilute that sweetened tea with cold, filtered water. This makes my one gallon jar full to just before the glass turns for the shoulder. Let this sit until it's at room temperature.

Left side is the hot sweetened tea, undiluted. On the right
is the jar (one gallon) after I diluted the tea with cold water.
Note the color difference between the new batch and the
Kombucha in the jars I just bottled in the photo at the
start of the post!
     6.  Put SCOBY gently on top of new tea batch, same side up as I took it out on.

Adding the kombucha culture. If you're
wondering, it's something like the consistency
of raw calamari to the touch. Maybe just a
little slimier!
The mother culture will float right on top, and take the shape
of whatever container you use. Even if it sinks, that's OK too -
it will come back up to the top eventually!
      7.  Pour the two cups of the old brew that I'd set aside gently on top of the jar.

New batch after adding the innoculant. The
purpose of adding some of the old culture to
the new is to give the new batch the right
pH to start with. Part of why it is so easy to
maintain the culture is that not much else will
grow in something so acidic, so we want to
keep it that way, right from the start!

     8.  Cover with cloth / rubber band and set aside. I let mine brew about a month; I've read that it can be "finished" much sooner than that, but I like mine sour!


Covered this way, I don't even have to explain
to visitor what's in the strange jar on the counter!
I keep it in a dark spot, out of the way so I don't
disturb it much. You do want air exchange though,
so be sure not to seal the top down with a lid!
I've also read that fruit flies love this stuff, so a
cotton cover like this should work to keep them out.

Sunday, May 15, 2011

Some of the Local Scenery

One of the most frequent responses I got when people talked to me about blogging during the Dark Days Challenge was "How in the world do you find the time?". Even here at home, my husband and I would talk about how much time I was spending cooking (and then writing about it), yet I personally didn't feel like it wasn't fitting in. The cooking was fun and exciting, eating local in the winter was an eye-opener, the blogging new and challenging, and I wasn't ever left feeling like I ever should have been doing something else instead.

These days, the sky is light in the mornings by shortly after five, and we can (and often do!) work outside until nearly nine at night. We've had what seems like a million projects going on, in addition to the usual business of spring with holidays, birthdays, visitors and trips taking us away from home. All of a sudden I'm finding not just that I'm not cooking as much, but I'm (clearly!) not blogging, and I am perpetually feeling like there's just one more thing that I need to be doing before the end of each day.

Last night Doug went to bed with no dinner, and I had a turkey and hummus sandwich at about eleven, while sitting in front of the computer, finishing the last of my work. I guess that goes to show that outside of the apparent reasons for doing that local-foods challenge in the winter, it was a good thing it happened at that time of year, or I would never have gotten as far as I did with it!

At the same time, I do hope to settle into more of a routine here soon and as we're able to get more and more from our (and my parents'!) garden(s), I'd like to keep trying to write about some of the more local meals we make. In the meanwhile, I'll keep busy with all those projects and enjoy the nice long, bright days!

For a taste of what's going on around this NY home, here are a few pictures taken in the last month or so:

Early spring: daffodils from Evelyn that we planted
last fall, up and showing their cheery heads.
A collage of shots from my trip to CA in April.
Me and the bug, ready to go to the "'wimming pool"!!

Choo-choo cake for birthday #2. Somehow I managed to not
get a shot of it finished and decorated!

The Birthday Boy and his happy Daddy!
Planting asparagus (hopefully more to come
on this in a separate post).

Later spring - first lawn mowing of the season!

Rhubarb transplants (6 of the 8) from Aunt Sally -
can't WAIT until next year to eat some!!
We ran into some friends from Kendal Day Care while at the
Ithaca Farmer's market one Saturday and shared
some good laughs!
My mother's day fuschia plant!

Mother's day pancake breakfast with GrammE!

Pa tilling and Doug picking rocks in the garden.

Watching the rototiller -
one looking at the camera,
one not....
then the other way around!!
A funny shot of the chicks at two weeks old.
And just a couple days later. They're changing so fast!!

My new raised bed herb planting boxes!!
The "water to the garden" project. The Problem: cracked pipe.
Cutting away the pipe so we can put a drain valve in the
replacement piece.

Chipping chipping chipping...

Tulips are up now - again bulbs from Ev, planted last fall!
Ornamental apple tree blossoms in the front yard.

Apple blossoms in side yard.
Pear blossoms.

Peach blossoms.

Cherry blossoms.
Late spring: lilacs just starting to bloom!